Monday, August 19, 2013

How to build a rain barrel.

I've written about rain barrels before.  I use them to feed the drip irrigation system in my garden and for watering the chickens and ducks.

The ducks have really increased my need for water.  So I thought I'd get some more barrels.  Instead of buying already made rain barrels I decided to make them myself to save some money.  I started by picking up 3 barrels from a guy on craigslist.

I got two 60-gallon black barrels and a very faded 50-gallon terra cotta barrel.  They were $20 each.

My parts list included:

I started by drilling a 3/4" hole in the barrel.  Then I put the threaded end of the hose bib through the washer.  I applied a bead of silicone to the washer.  After that I simply screwed the hose bib into the hole.
Then I had to reach inside of the barrel and tighten the conduit locknut to the threads of the hose bib.

I bought the short terra cotta barrel with a special use in mind.  I'm going to put it under my deck.  Since it's shorter and will be lower than the rest of my barrels I can't fill it from the bottom.  Water seeks its own level and it would simply spill out over the top.  The solution?  I bought a float valve.
I drilled another 3/4" hole near the top of the barrel and installed the float valve.
I attached a right angle barbed fitting to the float valve.  I'll run irrigation tubing from the other barrels to feed this one.  When the water gets high enough the float valve will close and stop the flow of water.  That will prevent it from overflowing and draining my other barrels.
Here's the completed barrel ready to be put in place.  I didn't bother to drill holes or put a screen on the top.  It's going to be an overflow barrel and won't be catching any rain. 
The hose bib on the next barrel was done in exactly the same way.  It's going in a different location and as of now I won't be putting a float valve on it.  Instead I installed a brass overflow. 
This is going to be another overflow barrel.  I didn't install a screen, but I did drill some tiny holes in the lid to allow rain water to drain in.   It's not going under a downspout so it just needs to handle the water that falls on it.  I'm hoping that a solid top will reduce the amount of pollen that gets into the barrel in the spring.  That was a problem earlier this year.
Close-up of the brass overflow.
The third barrel is still a work in progress.  I got as far as installing the hose bib.  I'd like to put a float valve on it as well, but I don't have one.  It's actually something that I've never been able to find at Home Depot.  I have to travel outside my normal route to get one.

Saturday, August 10, 2013

We have another rabbit. With any luck that'll lead to more rabbits in the future.

I haven't written much about the rabbit.  I just haven't had the time with the garden, the ducks, and the broilers.  That and my daughter is really good about taking care of the rabbit.  She makes sure that it has food, hay, and water every day.  And she let's me know when the manure needs to be dumped off of the tray.  Then she'll hose it off.  So there isn't much for me to do with the rabbit.

Anyway, my wife has been watching craigslist and finally found a male Holland Lop.  She picked it up yesterday.
My daughter put the two rabbits on the porch for some play time today.  The male was kept inside the pet pen and the female outside. 
They both too young to be "dating" just yet.  So they were kept separated.
Aww, aren't they so cute!
The plan is to breed them in January so we have bunnies available for sale right around Easter.  That's the plan.  That should be interesting.  I'm sure it'll be educational. 

Tuesday, August 6, 2013

Self watering 5-gallon bucket results

I made some self watering containers out of 5-gallon buckets a while back.  I thought I should post an update with how they are doing.
Tomatillos on May 8, 2013.
Here's a picture I took of them the other day.
July 28, 2013
I'm not sure what to say about them.  The tomatillo on the left is a lot bigger and greener than the other three.  But, it's not doing nearly as well as the ones I put in the raised beds.  I think the bucket on the left got better soil than the other buckets.  Or maybe tomatillos aren't the best things to grow this way.  I don't know. 

I'm undecided about trying these containers again next year.  All of my raised beds have drip irrigation fed by rain barrels.  That system has worked quite well so far.  I'm not sure I have a need for self watering bucket containers.  Oh well.  It was worth a try, and it wasn't a complete failure. It just didn't work as well as I had hoped.

Monday, August 5, 2013

Backyard broilers -- Was it worth it?

I'm finally done with the broilers.  So the question is, "Was it worth it?"

First, let's look at the numbers.  I've created two tables.  The first one lists my costs and income for this venture.  I didn't include costs for items that I consider to be infrastructure.  I'm referring to things that can and will likely be used again, the tractor, feeders, and waterers.  I only included things used to raise and process the birds. 
Item Date Income Expense
Chick Grit and Starter feed. May 12 0.00 ~20.00
Hatchery order for 25 chicks May 17 0.00 67.50
Gave away 4 chicks to a neighbor May 17 0.00 0.00
Sold 6 chicks ? 15.00 0.00
Sold 5 chicks ? 20.00 0.00
50 lb. 20% feed May 22 0.00 20.82
40 lb. 18% feed June 14 0.00 14.98
40 lb. 18% feed June 25 0.00 14.98
50 lb. 20% feed July 5 0.00 18.59
Heat shrink bags July 14 0.00 15.00
50 lb. 16% feed July 15 0.00 13.74
Total: 35.00 185.61

Total cost: $150.61

The second table lists the processed weight of each bird.  I also included how much that bird would have cost at a farmers market price of $6.50/lb.  Note: I didn't do the calculations.  I let Google do it.  If you type "3 lbs 6 oz * 6.50/lb" into Google, it'll give you the answer.  I did the same thing for computing the total weight.
Bird Date Weight Price at $6.50/lb.
Bird 1 July 7 3 lbs 6 oz 21.94
Bird 2 July 13 3 lbs 8.3 oz 22.87
Bird 3 July 13 3 lbs 7.5 oz 22.55
Bird 4 July 13 3 lbs 7.9 oz 22.71
Bird 5 July 20 4 lbs 8.8 oz 29.58
Bird 6 July 27 3 lbs 11.4 oz 24.13
Bird 7 August 2 5 lbs 0.1 oz 32.54
Bird 8 August 2 4 lbs 1.3 oz 26.53
Bird 9 August 3 4 lbs. 6.0 oz 28.44
Bird 10 August 3 4 lbs. 6.3 oz 28.56
Bird 11 August 3 3 lb. 11.4 oz 24.13
Totals: 43.6875 pounds 283.98

My cost:  $150.61
Total pounds:  43.6875
My cost / pound = $3.45

I ended up with 44 lb. of chicken for $150.  That means I saved $133 from what I would have spent at the farmers market. 
So was it worth it?

That's still a hard question to answer.  The local grocery store had chicken on sale the other day for $0.99/lb.  The 44 lbs. I ended up with would have cost ~$44.  So based on cost alone it was not worth it.  (I haven't even factored in my time.)

I happen to think there is a lot more to this question than cost.  To answer this I have to evaluate my original motivations.  

They were:
  • Nutritional
  • Economical
  • Moral/Ethical
  • Educational
Nutritional: 
I don't remember exactly when I first read about arsenic in chicken feed, but I do remember being surprised by the news.  Now, I know that arsenic occurs naturally.  It's probably in my garden soil.  I'm probably eating it in my tomatoes.  I get that.  But I see no reason to intentionally add it to chicken feed.  I thought it had been taken out in 2011, but this article from July 2013 says that it's still being used.

I've only mentioned arsenic so far.  Who knows what else is in industrial chicken feed?  It's loaded with antibiotics as well.  Obviously if you want to avoid this stuff you need to source your chicken from a non-industrial farmer.  That's why I had to seek out a pasture-raised bird at the farmers market (where I spent $6.50/lb on one).  This leads me to my next point.

Economical:
Spending $6.50/lb. on a chicken seems like a lot to me.  It's not hard for my family to finish a 4 lb. chicken in a single meal.  As much as I like supporting farmers and farmers markets, I couldn't, and didn't want to, spend that kind of money for chicken.  I already had layers in my back yard, so I figured, why not give raising broilers a try?

Moral/Ethical:
I'm not PETA activist and obviously I have no problem with eating meat.  However, I feel that if we are going to eat meat that we should give the animal the best life we can.  The way modern industrial chicken farming is done is cruel.  The birds go from shell to slaughter in 6 weeks.  They spend their short lives in the dark, wallowing in their own waste.  They're cramped into as little as 130 square inches.  That's less than a square foot!  The birds can grow so fast that their legs break under their own weight.  I don't think I need to elaborate on this any more.  There's plenty of info about this out there.  There's a 12 minute documentary on youtube or this article from January 2013 if you prefer to read.

I think this point is closely related to the nutritional point above.  If you care about how the birds are raised, what they eat, and how they are slaughtered, then you need to avoid industrial-farmed chicken.

My broilers spent the first 3 weeks of their lives in the garage.  Once they had feathers and were big enough they went outside.  Sure, they were kept in tractors, but they had fresh air and sunshine.  They were able to do what chickens do and eat bugs and grass.  The last 6 of my birds were fortunate enough to leave the tractors and were able to roam the yard for two weeks.  That's a far better life than any industrial bird has.

Educational:
Actually, this wasn't one of my original motivations.  It became one a few weeks into the project when I discovered I was learning so much by raising my own birds.  The first time I realized that was on the way back from buying feed.  I was in the car and an ad came on the radio.  The local grocery store was selling chicken for $0.99/lb.  I was stunned.  How are they able to sell chicken at that price?  I already knew early in the process that it it was going to cost me more than that.  What corners are they cutting to sell chicken that low?  This again goes back to the previous points.  To get chicken to cost so little you have to use the industrial farming model:  cram chickens into a small space and feed them grain laced with antibiotics and arsenic. 

I also learned how to process a chicken in a humane manner.  I didn't know how to do that before.  I got to see their progression from chick to full sized bird.  I got a full understanding of what it takes to get a bird from the shell to the freezer.  This point alone made this whole project worth the effort.

So it was worth it.  How does it taste?

The first bird I processed went from the yard, to the garage, to the grill, to the dinner table.  To be honest, had I been blindfolded I don't know that I could have told the difference between it and a store bought chicken.  It was good, but it tasted like chicken.

The second chicken we had was awesome!  It was one that had been frozen.  My wife thawed it out in the fridge for 3 days or so.  Then she brined it and cooked it on the grill.  It was amazing.  I can't explain why a frozen and thawed bird was that much better, but it was.   

Are you going to do this again?

Not any time soon.  I might think about trying this again next spring.  There's a lot of labor involved.  During the first few weeks I was cleaning the cage several times a day.  Once they were outside I had to move the tractors multiple times a day.  And then there was the time needed to process the birds.  It's a lot of work.  I need a break from it for a few months.  I'll re-evaluate the idea in the spring and decide then.

Saturday, August 3, 2013

Backyard Broilers -- Final Graduation: Round 2

The last of the broilers went in the freezer this morning.  I took care of 3 birds and it took me 3 hours (including clean up time).  I put processed two birds last night and left the garage set up afterwards.  I didn't have to set up anything this morning.  I just had to heat water and catch the birds.
They look nice and professional.  Those heat shrink bags are great.
4 lb. 6.0 oz

4 lb. 6.3 oz
3 lb. 11.4 oz
At some point I need to figure out how many pounds of chicken I ended up with. 

Friday, August 2, 2013

Backyard Broilers -- Final Graduation: Round 1

The last of the birds are 11 weeks old now.  They've reach maturity so it's time to put them in the freezer.  I took care of two tonight and plan on taking care of the other three tomorrow.

It's getting harder with these last few.  I'm getting attached.  They've been wandering the yard and getting along with the layers great.  The ducks have moved into the tractor with them at night and today they even found the coop.  It was the first time they've ventured into that corner of the yard.
After dinner I set up the garage and put a pot of water on to boil.  Then I went out and grabbed a bird.  The first few ran away from me, so I had to get the one that was laying down minding her own business.  That didn't help me feel better about what I had to do next. 

The processing went really well.  I guess it's all of the practice that I've had.  In the past I've averaged about an hour per bird.  Tonight I was able to get two birds done in less than 90 minutes.  I did one thing differently and I think it helped a lot.  I used a much larger pot of water to scald the birds before plucking them.  The greater volume of water meant that it didn't cool down as fast.  That made the plucking go so much faster. 

The first bird was huge!  It was 5 lb. 0.1 oz.  I didn't know chickens got that big.  Seeing this made me feel a lot less bad about putting them in the freezer. 
It also made it easier to get the next bird.  She ran and made me put forth some effort to catch her.
She ended up being a healthy 4 lb. 1.3 oz.  It makes me wonder how big the next 3 are going to be.

Thursday, August 1, 2013

Ducks and water.

We've had ducks for about a month now.  They love water.  They're in it all the time. 
It doesn't take them long to make the water look like this.
I don't know how often their water needs to be changed, but I think once or twice a day seems like a good idea.  Tipping the tub over and dumping all of the water at once will get the job done.  It also washes away the mulch.  This was no good.  So I decided to install a drain.
I started by drilling a hole and then installed a uniseal
Then I inserted a 3/4" section of PVC pipe with a valve on it and refilled the tub with clean water.
The ducks approve!
They've gotten big.
Now emptying the tub is as simple as turning a valve.  The pipe allows it to drain much more slowly so the mulch isn't washed away.

The next step was to automate the filling process.  I've been filling the tub from the rain barrels.  I have to keep an eye on it though and shut the water off when the tub is full.  Since I'm dealing with low pressure this can take a while.

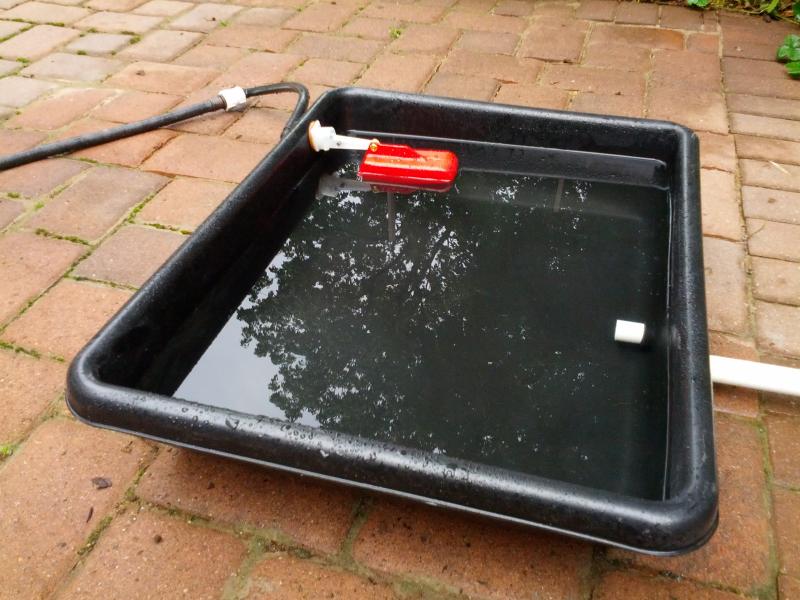
The solution?  I picked up a float valve at Agri Supply.  I installed it by drilling a 3/4" hole near the top of the tub.
 I also had to remove some of the outer lip.  Otherwise the threads on the float valve wouldn't be accessible.
I screwed a drip irrigation fitting to the float valve and attached a short piece of irrigation tubing.  That tubing was connected to a garden hose by another barbed fitting and a FPT to FHT adapter.
I opened the valve on the rain barrel and the tub filled with water.  It took a while to fill, but eventually the water rose enough to close the float valve.
 The ducks were curious about the float valve.  They nibbled on it for a while. 
After the ducks finished their play time I decided to turn the float upside down.  This allows the tub to fill with an additional inch of water.  I don't know if the ducks care, but I figured why not.
This setup isn't fully automated.  I still have to manually drain the tub.  I could put a timer valve on the drain, but I haven't decided if I want to make that investment or not.