Saturday, March 29, 2014

Greenhouse Climate Control or: How I learned to Stop Worrying About My Plants Freezing.

Keeping plants from freezing in the greenhouse is always a concern in the winter.  I've seen my greenhouse get to 100* during the day and at night it'll drop into the 30's.  It just doesn't retain any heat.  To deal with this I bought a thermostatically controlled outlet from Amazon.  Supposedly it comes on at 35* and goes off at 45*.
I don't really trust it.  I haven't been able to test it to confirm that it actually comes on at 35*.  Not to mention that that is awfully close to freezing.  Even if it does come on and the temperature is dropping fast, the greenhouse might not heat up in time to keep the plants alive.

The red thermostatically controlled outlet is supposed to come on at 78* and got off at 70*.  I was actually outside one day and heard the fans shut off.  I checked the temperature in the greenhouse and it was 67*.  That's 3 degrees off from what it's supposed to be (assuming my other thermometer is correct).  I can live with that for fans, not for the heat.

As a result of this I've had to manually turn the heater on at night and off in the morning.  That's really inconvenient. 


I found the solution in the home brewing community.  Home brewers need to keep their fermentation vessels at a specific temperature and there's a nifty device called an STC-1000 that will do just that.  There are a lot of forum posts, blogs, and youtube videos on how to use the thing.  I went by this one.

The STC-1000 has a temperature sensor and two relays.  It turns one one for heat and other to cool.  It's exactly what I needed.

I also needed an old computer power cord, a receptacle, a wall plate, wire, a wire nut, and a 6x4x2 project box from Radio Shack.
 The first step was to cut holes in the project box.  I used a Dremel to cut a hole in the lid for the receptacle and a hole in the end of the box for the STC-1000.

I broke off the tab connecting the top and bottom plugs on the receptacle.  This allows them to be controlled independently.  One will come on for the heat and the other to cool.  I used the wiring diagram found here.

The sensor wire and power cord were run through rubber grommets.  Getting the grommets in and the cords through them was probably the most challenging part of this entire build.

Here it is powered up for the first time. 

I put the sensor into my chest freezer and watched the display immediately drop.  I was pleased with how fast it reacted.  One of the few downsides this thing has is that it only displays temperatures in Celsius.  Programming the thing was a pain too.  The directions that came with it were badly translated.  I couldn't decipher them.  Luckily Google knows everything (or at least where to find it).

I set the temperature on it to 4.4*C which is 40*F.  I plugged a light into the heat outlet, put the sensor in the freezer and waited.  When the panel hit the desired 4.4* the light came on. 

Then I wanted to figure out how to set the temperature for the other outlet.  I wanted the fans to come on at 75*F or 23.8*C.  Well, it doesn't work that way.  You can only set one temperature.  When the sensor drops below that the heat relay comes on.  If it's above that the cold relay turns on.  That's not exactly what I wanted, but I can work with it.

My solution was to continue using the red thermostatically controlled outlet that I already had.  I plugged it into the cold outlet.  I plugged the heater and a light bulb into the hot outlet.  The light will make it easy for me to know when the heat is on. 

Having it come on at 40*F should give the heater plenty of time to warm up before the temperature drops further.  It'll also save me electricity and money by shutting off at 40*.  I won't have to leave it on all night and heat the greenhouse to 48-50*.  I'm very excited about this.  Of course, we're fast approaching our last frost date so it may not get used at all.  Oh well, there's always next year.

Bonus tomato picture: 
It's a good thing that we're getting close to our last frost date.  These things have gotten huge!

Wednesday, March 26, 2014

Baby Rabbits -- Week 1

The baby rabbits were born one week ago today.  All five of them seem to be doing well.  They pretty much just stay in their nest and sleep.  The momma rabbit has been real protective.  She gets annoyed and charges at your hand whenever you get near them.  We've still made an effort to hold each of the babies every day so they get used to us.

They've started to get hair, but none of them have opened their eyes yet.

Aww...

On Friday, two days after they were born, I made a grim discovery.  I went to check on the babies and only found 3 of them curled up together.  So I looked around the nest for the others.  Much to my surprise I found 3 more.  That means she gave birth to 6 babies, not 5.  My excitement from that discovery didn't last long.  One of those three was not moving.  I don't know if it was stillborn or what.  I was sad.  I removed it from the hutch and buried it in the woods.  I moved the two that had been separated back with the other three.  Next time she has a litter we'll know enough to check the nest for hidden babies.

Sunday, March 23, 2014

Seedlings in the greenhouse.

Winter can't go away soon enough!  I started seeds on Feb. 9.  Once they got a few inches tall I moved them to my greenhouse (after I repaired it).

Now they're huge!

Things have really taken off, especially the tomatillos.

The spinach has done so well that we picked and ate all of it already.  I planted lettuce in its place.
The last thing I have going is rainbow chard.  I've never grown it before.  So far it appears to be doing OK.

Wednesday, March 19, 2014

The baby rabbits are here.

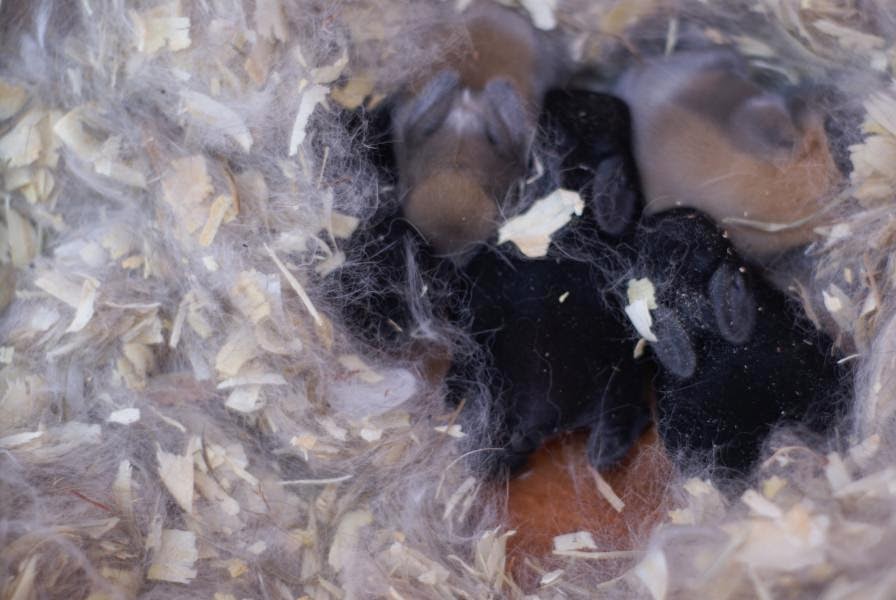
The doe rabbit has spent the last day or two working overtime building a nest.  I don't know how she has any hair left.  Anyway, today I was at work and my wife sent me a text to say that it looked like the babies were on the way.  Of course then she left for the store and I didn't get any further updates for 90 minutes. Then finally she sent me the picture below.
There are 5 tiny baby rabbits.  This is pretty exciting.  It's our first successful attempt at breeding animals. 

Sunday, March 16, 2014

Could baby bunnies be on the way?

We didn't have any luck at our first attempt at getting baby rabbits.  It looks like the second attempt may have been more successful.

About a week-and-a-half to two weeks ago my daughter went out to check on the rabbits.  When she came in she said she could feel something move on the underside of the doe.  I didn't know what to think of it.  I didn't want to check for myself.  I was worried about handling her and possibly hurting the babies (if there actually happened to be any).  My wife went out to check a few days later and got bit in the process.  Momma doe was and has been quite irritable since.

My wife reminded me on Friday that it was less than a week away from her due date.  So my daughter and I put pine shavings in her hutch.

And what did we find today???  She's pulled out a lot of hair and has moved hay in there as well.

It doesn't look like a nest to me, but I have no idea what a rabbit nest is supposed to look like.

She didn't pull hair or move hay the last time.  She just kicked all of the shavings out of the box and made a mess.  I'm taking this as a good sign.  We could be less than a week away from having more rabbits!

Monday, March 3, 2014

Garden Trellises

My 2014 garden plan calls for several trellises.  I need one for slicing cucumbers, one for pickling cucumbers and one for peas.  Rather than buying something I thought I'd use what I had around the old homestead. 

I went into the woods and found several straight trees and cut them into 8' lengths.  Then I placed them in the corners of three of my raised beds.
Next I used square lashings to attach 8' long poles horizontally between the vertical poles.
At this point it was getting more difficult to find straight trees to turn into poles.  I did manage to find one 16' in length and used it to connect the trellises in all three beds.  It too was attached with square lashings.  This should add some structural support. 

Since I couldn't find a second 16' pole I just used paracord on the other side.
For the final step I had to create the grid on the trellis itself.  That's the entire point.  The plants have to climb up something.  The first bed is where the peas are going.  I tied twine to the bottom of the post on one side and simply wrapped it around each post until I got to the top.  I tried to leave 4" spaces between each row.  Once I was done with that I tied 3 pieces of twine to the top pole and brought them down vertically.  I wrapped them around the individual rows of twine running horizontally.  I'm hoping that this adds additional support.
The grids on the next two trellises were larger.  Rather than just wrapping the twine back and forth around the posts I cut individual pieces and tied them on each end.  I spaced them 6-8" apart.  Then I ran several pieces of twine vertically from the top pole to form a grid. 
I'm pretty happy with the results.  It cost me less than $4 for the twine.  I just hope that it's strong enough to hold up all of the vegetables I plan to grow on it.