Tuesday, December 10, 2013

Chicken and egg update Fall 2013 edition.

There isn't much going on around the homestead so the blog posts have been infrequent.  I suspect that that will continue to be the case.  It's too cold and dark by the time I get home from work.  I'm not getting any projects done as a result. 

I thought it'd be a good time to revisit the chickens.  I currently have six layers.  For most of the year I was getting between 3 and 6 eggs per day.  Once the days started getting shorter that dropped off.  I guess they're on vacation.  I'm getting 1 egg per day now.


From what I've read they're laying is affected by light.  They aren't getting much sun, so they aren't laying.  A lot of days I don't let them out of the coop until 8:00 AM and they're back in there by 5:00 PM.  Some people will put a light in the coop to keep them laying.  I'd rather just let nature do its thing.  If I get fewer eggs then I'll just have to manage.

In addition to getting fewer eggs, some of the birds are molting.  This has been most evident in my Barred Plymouth Rock.
This is how she looked in September.
Now she looks like this.
 
 
I apologize for the bad pictures, but chasing around a chicken with a cell phone and then hoping it holds still is no easy task. 

As a result of the molting I started giving them 18% protein feed rather than the usual 16%.  They need the extra protein to produce new feathers.  I'm hoping that the new feathers grow in and that they start laying again soon.  If they don't, I might have to think about putting them in the freezer

Saturday, November 16, 2013

The peppers are done.

I wrote quite a bit about peppers this year.  I started several from seed early in the year.  They went into the ground in April and didn't do well.  I had to start more from seed in May.  Eventually I got peppers to grow and was able to get several good harvests.  Well, they are finally done.  Somehow they managed to survive the first frost, but not this most recent one.  It got down into the 20's and when I came out in the morning it was obvious that they were dead.
The kale and cabbage are doing fine.


My cell phone takes lousy pictures in the morning when the sun isn't over the garden.  The picture below was taken at a different time and is a little better. 
I'm actually impressed that the peppers lasted as long as they did.  They outlasted pretty much everything else and made it mid-November.  The only stuff out there now is the kale and cabbage that I planted for a Fall garden.

Sunday, November 3, 2013

The final overflow rain barrel fix.

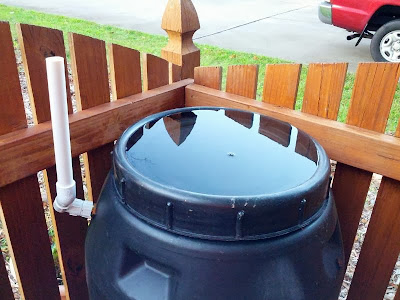
One of my overflow rain barrels is lower than the rest of my rain barrels and as a result it overflows.
The only solution I could come up with is to fill the barrel from the top with a float valve and empty the barrel from the bottom with a check valve.  I took care of installing the check valve a few weeks ago.  With that taken care if it was time to install another float valve
I decided to install it using a 1/2" FPTxFPT coupling.  I screwed the float valve into the coupling and then screwed the other end of the coupling to the brass overflow that I had installed on the rain barrel
I look at this now and realize that I could have removed the brass overflow and just screwed the float valve directly into the barrel.  Oh well, that can be a project for another time.  Until then, this will work.

Sunday, October 20, 2013

The Fall Garden

The weather has cooled off, so it's time for the Fall garden.  I started some kale and cabbage seeds in the garage a while back.  I don't remember when exactly.  Once they got big enough I moved them into one of the raised beds.
10-06-2013
I also planted seeds directly in the beds.  They've sprouted and seem to be doing OK so far. 
10-12-2013

Friday, October 11, 2013

Companion planting with hairy vetch

I've read that growing tomatoes with hairy vetch works well.  So I thought I'd give it a try.  You plant the vetch in the fall once the tomatoes are done.  It grows through the winter.  In the spring you chop and drop it.  The vetch becomes mulch for the tomatoes.

I started by clearing out some of the raised beds.
09-01-2013
I got several pounds of hairy vetch seed from a local gardening store.  I hand spread the seed on the bed.  I didn't know how much to put down.  So I just threw down several handfuls.
 It took a while for the stuff to germinate. 
09-22-2013
10-11-2013
The picture above isn't very good.  We've had a lot of rain and clouds the last few days.  I'll have to get some better pictures as it progresses. 

Thursday, October 10, 2013

Harvesting peppers

I didn't have a lot of luck starting peppers last spring.  I started seeds in my garage and moved the plants into my raised beds in April.  Then we had a month of clouds and rain and the plants didn't grow at all.  I had to start more seeds in May
Pepper harvest on 9-25-2013

I can't really complain now though.  The peppers are pretty much the only things left in my garden.  The tomatoes got too much rain didn't do too well as a result.  I still have one or two tomatillo plants hanging on.  I've taken the rest out.  They were falling over and turning brown.  I got tired of looking at them and took them out.
I don't know what kind of peppers these are.  I should really learn how to identify them.
Jalapenos.
Here's the raised bed where most of the peppers reside.  Some leaf lettuce in the corner came back to life once it got cool again.  The tomatoes at the end need to be removed.

Pepper harvest 10-09-2013
We had some strong winds the other day so I went out and picked as many peppers as I could (see above).  I left a lot of the small ones.  I don't know if they'll get big or not.  It's getting kind of late for peppers.  If they don't make it I won't complain.  I'm really happy with what I was able to produce.

Wednesday, October 2, 2013

DIY Check valve

The other day I wrote a post about one of my rain barrels being too low and as a result it was overflowing.
I've spent a lot of time trying to come up with a solution to this problem.  The best option I could think of is to fill the barrel from the top and empty it from the bottom like I did with the barrel under my deck.

This requires a float valve at the top to stop the flow of water when it's full, and a check valve at the bottom so water can flow out but not in.

The check valve I used previously was $15 (with shipping).  I didn't want to spend that much again, so I had to come up with something else.  That's when I found the following video on youtube. 
Making a check valve is pretty simple.

Parts list:

I started by cutting both ends off of one of the nails with a pair of wire cutters.
 Then I drilled a 1/16" hole through the PVC pipe and inserted the nail.
 
Then I placed a rubber O-ring in the slip side of the slip x FHT PVC fitting.  The rubber ball went in next.  The pressure from the water will push the ball into the O-ring and plug the hole.  This will prevent the flow of water in that direction.  When the water pressure from the other side is higher, the ball will dislodge and be stopped by the nail.  That creates enough room for the water to flow out.
The final step was to screw the barb into the fitting and glue the pieces together.
Water should only flow from the hose side to the barbed side.
As soon as I had thing thing put together I had to test it.  I got a short piece of irrigation tubing and a fitting that I had laying around.  I attached the newly created DIY check valve to the rain barrel, connected the tubing, and turned on the water.
 I verified that the water was able to flow in that direction.
 Then I reversed the connections.
 No water came out of the check valve.  Success!
The next step was to attach this thing into my overflow rain barrel.  I connected the irrigation tubing so that it'll fill the barrel from the top.  (I still need to get a float valve so it shuts off when full.)  Then I put the check valve on the outlet at the bottom and connected it to the tubing coming from my other barrels.  That way they'll be able to draw from this barrel when they get low. 
This barrel also feeds the overflow barrel by my shed.  That barrel is much lower than this barrel, so I don't need to worry about putting a check valve on that side of the splitter.  The water from that barrel won't run uphill and overflow this barrel.
The check valve caused some clearance issues.  It was too close to the ground which caused a kink in the tubing.  I remedied this by installing a 3/4" elbow between the PVC fitting and the barb adapter.

This setup seems to be working so far.  The barrel isn't filling from the bottom and overflowing.  I think I'll have a better idea of how well it works the next time we get more rain. 

Thursday, September 26, 2013

The ducks have migrated to a new home.

The ducks have had me really stressed out this past week.  They got loud!!!  We got Khaki Campbells for two reasons.  They are great egg layers, and they are supposed to be one of the quieter ducks.

Well, if these things are quiet I'd hate to hear the loud ones.  It turns out that the females make a loud honking sound any time they get startled.  And they get startled a lot!  I couldn't even go out into my back yard without them freaking out.  It was annoying.  If it was annoying to me, I can only imagine what my neighbors must have thought.


None of my neighbors said anything to me, so I spent a lot of time debating what to do.  Should I just keep them until someone complains?  Should I get rid of them, and if so, where?  I didn't want to just release them into some random pond.  They might wander off into a road and get hit by a car.  They are fairly tame and are used to my dog so they might get eaten by predators.

I didn't want to get rid of them.  They're so entertaining to watch.  They have very unique personalities. We got them as a project for my son.  He did a good job taking care of them.  Their constant little quacking was pleasant to listen to while we were in the yard.  But... the honking was just too much.

Lucky for me, I knew of a great place where they could go, Cul de Sac Critters.  It's run by a family not too far from where I live.  They keep rabbits, chickens, and have ducks on a pond.  I visited them with my daughter to learn about rabbits before we got ours.  I contacted them and they were happy to take more ducks.  And wouldn't you know it, one of my neighbors was looking to get rid of 3 drakes.  So I took them too. 

I got home from work tonight and rounded up the ducks with my son's help.  They weren't happy to be put into boxes.  Then we went to our neighbors and picked up a box of drakes (male ducks).  And off to Cul de Sac Critters we went.

We went down to their pond and the 4 ducks they had swam away.  My son opened the boxes and released the birds one by one.
After the 6 birds were released the first 4 came back from the middle of the pond to greet them.
It was like a duck party after that.  The whole group of them were quacking and flapping and diving under the water.  They were doing what ducks do.  Seeing their reaction turned my stress and sadness into pure delight.  It was a really great sight. 
My son handled it really well.  He said that he was glad to see how happy the ducks were.  I think he understands the situation pretty well.  We tried something, and it didn't work out.  That's the way it is sometimes.  He's already talking about his next project.  He thinks he might want to get some chickens of his own.  He's talked about Muscovy ducks too.  (They're known as the quack-less duck.)  He has some time to decide.
I think watching from the dock was his way of saying good-bye.

Monday, September 23, 2013

Recipe mashup: Pumpkin Pecan Bars

It's that time of year when leaves start to show their brilliant colors and all of your Facebook friends start posting about pumpkin lattes.  Me?  I've been craving a yummy pumpkin pie!  I made our 10-year-old one for his birthday.  I hear it was delicious, but since it contained condensed milk, I couldn't indulge.  I'm toying with the idea of coming up with a recipe of my own using homemade sweetened condensed coconut milk but I haven't gotten around to testing it out yet.

But this past weekend, I just couldn't wait anymore.  I NEEDED something pumpkin!  So I browsed my Pins and found two recipes that I'd saved that sounded just like what I was craving:

Sadly, though, I lacked agar for the first recipe, and fell way short on almond flour for the second.  What is a girl to do?

Take it easy!  I got just what you need for that pumpkin craving!

You mashup those recipes!  That's what ya do!
I took the crust from the first recipe, messed around with it a little, and modified the pumpkin custard from the second recipe, and voila!  Pumpkin magic.  I can't wait to make it again!
In fact, I was so pleased with the results, I had to stop myself from eating the rest
so I could have a picture to share!  (Not pumpkin bars to share, mind you.  Hands off!
That last piece is mine!)

Pumpkin Pecan Bars

Crust:
1 6oz. bag whole pecans
1/2 cup almond flour
5 soft pitted dates (soaked for 15 minutes in warm water)
1 teaspoon cinnamon
1 tablespoon honey
1/2 cup unsweetened shredded coconut (ok, I didn't use this the first time, but I will when I make it again.)
dash salt

Filling:
1 15oz. can of pureed pumpkin (not pie filling, just plain pumpkin)
1/4 cup honey
1/4 unsweetened canned coconut milk (I find that the boxed kind doesn't work well for baking things like this)
1 egg
3/4 teaspoon cinnamon
1/4 teaspoon nutmeg
1/2 teaspoon ground ginger
dash salt


Preheat oven to 325.  Add all crust ingredients to the bowl of your food processor and give it a whirl until mixture is an even crumble.  Dump into an 8x8 (glass recommended) baking dish and press into a crust-like form.  (I didn't press mine up the sides, but if you wanted a thinner crust, you could.)
Mix filling ingredients in a large bowl and pour over crust.  Bake 45 minutes until the filling looks just about set in the center and crust is browning on the bottom. Remove from oven and let cool 30 minutes on a baking rack.  Cover and refrigerate for at least one hour.  Serve chilled.

Kinda makes me wish I'd chilled and whipped the rest of that can of coconut milk!  Yum!


Friday, September 20, 2013

Overflow rain barrel problem.

I've written several posts documenting my attempts to capture more rain water by moving it from the barrels under my downspouts to remote/overflow barrels.  One of my fears was that the overflow barrels are lower than the other barrels and that water from the higher barrels would just spill out of them.  Well, that happened.  I attempted to fix the problem by extending the overflow into the air.  That didn't work.
The water seeped through the holes in the lid and flowed over the top.  I put those holes in so any rain that fell on the lid would drain into the barrel. 
This is a problem.  Now I need to figure out what to do about it.  The obvious solution would be to install a float valve and fill the barrel from the top and then put a check valve at the bottom and have it feed back to the other barrels.  (That is what I did for the barrel under my deck.)  That's an expensive solution.  I need to come up with something else.  I may just end up moving this barrel to another location.  I haven't decided yet.  It's something I have to spend some more time thinking about.

Wednesday, September 18, 2013

Enhancing my overflow rain barrel with a check valve

Recently I put a short barrel under my deck to hold excess water from the barrels under my downspouts.
I put in a float valve to keep it from overflowing.  You can see in the picture below that it is at least 8 inches lower than my other barrels. 
This works.  It's great.  I can fill the overflow barrel from my over barrels.  The problem is getting the water back out.  If I connect the two barrels together using the hose bibs the water from the higher barrel will move to the lower barrel and cause it to overflow.  I have to make sure that the water in the higher barrel is lower than the lower barrel before connecting them.  That's a nuisance. 

There is a solution.  It's called a check valve.  It's a valve that only allows the water to travel in one direction.  The next problem?  Finding a check valve with a low cracking pressure.  That's the amount of pressure needed to open the valve so the water can flow.  All of the check valves sold at Lowes and Home Depot had a cracking pressure of 2 psi.  Using gravity you get 0.433 psi per foot of elevation.  My short barrel is about 3' high.  So when it's full I'd get 1.29 psi.  When it gets low it'd be less. 

Luckily we have the Internet.  I was able to find a low cracking pressure (0.25 psi) check valve at zorotools.  It wasn't cheap.  I paid ~$15 for including shipping.
It was a lot larger than I expected it to be.
I ordered one with female pipe threads on both ends.  I used a 1/2" MPT x 1/2" MPT fitting on the intake side and screwed it into a 1/2" FPT to 3/4" FHT fitting.  This gets attached to the hose bib on the barrel.  On the output side I screwed in the standard 1/2" MPT to barb irrigation fitting.
I ended up swapping out the straight fitting for an elbow.
I rotated barrel 90* to make it easier to tie back into the drip lines already under the deck.
All of my rain barrels are plumbed together. The irrigation tubing connecting them intersects under my deck.
In short, when my rain barrels get higher than the overflow barrel they will fill it until it's full and the float valve closes.  As I drain the barrels the overflow barrel will drain as well.  This gives the whole system more capacity while keeping the overflow barrel of the way and out of site.

I have plenty of room under my deck.  I'm going to see how this works and then probably add a few more barrels under there.