One of my chickens started to become an escape artist. The chickens like to hang out on my wood pile. While there, the barred rock was hopping the fence. (The wood pile is there from some sweet gum trees that I had taken down last spring.)
I had put the wood here with the intention of splitting it. I made a few lame attempts to split some of it. It hasn't dried out enough yet, and it was hard work.
The solution? Put in a front yard hugelkultur bed.
I had tomatoes planted here last spring, but they didn't do too well. This area of the yard didn't get much sun once the leaves came in. The soil is downright awful here. It's basically sand. I put down a few inches of compost for the tomatoes, but I don't think it was enough. Anyway, I plan on using this for a fall garden.
I started by raking the area and clearing all of the loose material. Then I placed the logs on the ground kept them away from the property line. Next I added compost, five wheel barrow loads.
Obviously I'm going to need more compost.
The idea behind hugelkultur is to minimize irrigation requirements. The wood on the bottom will decompose and in the process become very sponge like. As a result, it'll hold a lot of water. Then you plant in the soil/compost above and the plants roots will be able to get the moisture retained below. It's a popular permaculture concept. If you think about it, it's how nature works. A tree falls on the ground and starts to rot. Insects and fungus help to break it down. Leaves fall on top of it and also decompose. Eventually plants grow out of whatever remains.
I'll have to wait and see how it works. Until then, the wood pile has been reduced in size. With any luck the chicken will no longer jump over the fence.
One final picture from the front door. I wonder what the neighbors are going to say about this.
Tuesday, September 4, 2012
Wednesday, August 8, 2012
Chicken coop finished.
The roof of the nesting boxes is in place in this picture. You can't tell from the picture, but I bevelled the front edge so it sits flush against the wall.
The first sheet of plywood is on the roof.
I finished the roof with some OSB and attached the plywood to the front wall.
The door has been hung and a latch will keep the chickens in and the critters out.
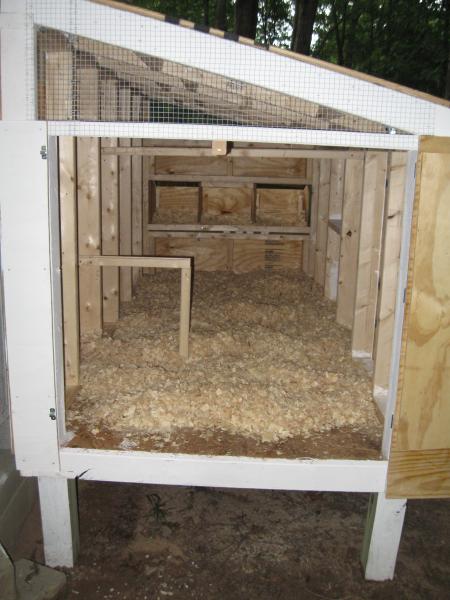
The door on the end will allow me to access the coop to clean it.
Two latches keep the door closed.
The pine shavings have been installed.
The birds on their first night in the new coop. The first two nights they went into their old coop and I had to transfer them. After that they figured it out and went in the new coop on their own.
The roof of the nesting boxes is hinged. That'll make getting the eggs easier.
Finally, I installed a nice ramp for them.
The roof was shingled and the entire coop was primed and painted.
The first sheet of plywood is on the roof.
I finished the roof with some OSB and attached the plywood to the front wall.
The door has been hung and a latch will keep the chickens in and the critters out.
The door on the end will allow me to access the coop to clean it.
Two latches keep the door closed.
The pine shavings have been installed.
The birds on their first night in the new coop. The first two nights they went into their old coop and I had to transfer them. After that they figured it out and went in the new coop on their own.
The roof of the nesting boxes is hinged. That'll make getting the eggs easier.
Finally, I installed a nice ramp for them.
The roof was shingled and the entire coop was primed and painted.
Sunday, August 5, 2012
Chicken coop cont.
The chicken coop continued... The nesting boxes and roof.
I made three nesting boxes out of some scrap OSB that I had laying around.
The rafters for the roof are notched 2x4's. Then ends are cut at angles. A miter saw would have made this a lot easier, but I managed with a circular saw.
Rafters in place with blocking in between them. I also used hurricane ties at each end to hold them to the walls.
Here's a view from the inside.
I put chicken wire over both ends. This should help keep the critters out.
More chicken wire mesh on the ends will allow for lots of ventilation.
I haven't mentioned it so far, but most of the structure was primed with white primer. Hopefully that'll help protect it from the elements.
I made three nesting boxes out of some scrap OSB that I had laying around.
The rafters for the roof are notched 2x4's. Then ends are cut at angles. A miter saw would have made this a lot easier, but I managed with a circular saw.
Rafters in place with blocking in between them. I also used hurricane ties at each end to hold them to the walls.
Here's a view from the inside.
I put chicken wire over both ends. This should help keep the critters out.
More chicken wire mesh on the ends will allow for lots of ventilation.
I haven't mentioned it so far, but most of the structure was primed with white primer. Hopefully that'll help protect it from the elements.
Wednesday, August 1, 2012
Chicken coop
The chickens are no longer small. They needed bigger housing, so I built a new chicken coop.
I placed my order through Home Depot's web site and got an email when it was ready. That was the way to do. There was no need to wander up and down the aisles and pull stuff off. They did it all, and then they loaded it into my vehicle. I had to drive with my knees in the dash, but 4x8 sheets of plywood do fit in a Kia Sedona.
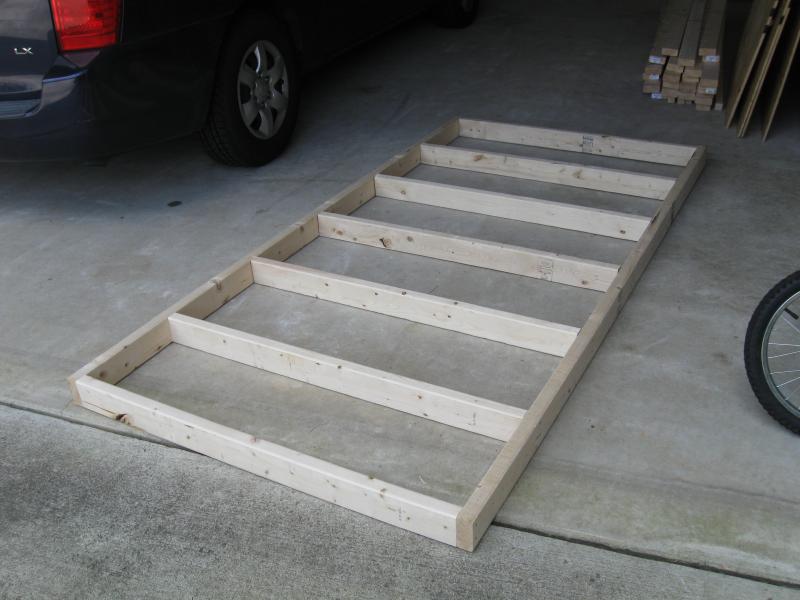
I started by building the floor. It measures 4x8.
Here it is with 4x4 lets attached. It's on a level spot behind the shed. This keeps it somewhat out of site.
For the floor I used a sheet of half inch OSB.
The back wall was essentially the same as the floor. It's 4' high.
Here's the back wall attached to the floor and held in place by some extra 2x4's.
The front wall is 3' high
The design more or less came from a book my wife picked up, "Chicken Coops for Dummies." That book had a design for a basic 4x4' coop. I doubled that and made mine 4x8'. The nesting boxes I built were different too, but I'll get to those later.
I placed my order through Home Depot's web site and got an email when it was ready. That was the way to do. There was no need to wander up and down the aisles and pull stuff off. They did it all, and then they loaded it into my vehicle. I had to drive with my knees in the dash, but 4x8 sheets of plywood do fit in a Kia Sedona.
I started by building the floor. It measures 4x8.
Here it is with 4x4 lets attached. It's on a level spot behind the shed. This keeps it somewhat out of site.
For the floor I used a sheet of half inch OSB.
The back wall was essentially the same as the floor. It's 4' high.
Here's the back wall attached to the floor and held in place by some extra 2x4's.
The front wall is 3' high
The design more or less came from a book my wife picked up, "Chicken Coops for Dummies." That book had a design for a basic 4x4' coop. I doubled that and made mine 4x8'. The nesting boxes I built were different too, but I'll get to those later.
Friday, July 13, 2012
Oh No! The pests killed my squash.
I was looking at my plants yesterday and noticed that two of my squash plants looked quite sad. Upon closer inspection I discovered the problem. The stems near the root were mangled and damaged. I moved the plant and it just fell apart. Inside were a bunch of worms. I'm guessing that these are the dreaded squash vine borers.
I removed the two damaged plants and mulched them with the mower. Maybe I should have fed those bugs to the chickens instead.
Luckily, my other two squash plants appear to be ok. Time will tell I guess.
Thursday, June 14, 2012
Trying out paleo for the whole family
We decided to do a little experiment this week. After a piece of cake and some lemonade kept my 8-year-old up way past his bedtime last week, he was agreeable to trying to cut the sugar and carbs for a while. This week has been our trial, and so far, it hasn't been so bad.
We started on Monday and the little princess was quite chipper about having some carrot sticks and ranch for breakfast! Don't you just love the "why are you pointing that camera at me this early" look, though?
As for my son, he was thrilled to be able to use the juicer and add whatever he wanted! It was mostly fruit, but he added carrots of his own volition and liked it so much that he wrote down what he used so he can make it again!
Here's a summary of what we've been eating this week:
Breakfasts:
Now that doesn't sound so hard, right? The thing I've learned with my diet changes is that simpler is better. I didn't try making all the kids' favorites with new and expensive ingredients. Instead, we pared down to the basics. Lots of meat and veggies, and, to make the transition more palatable to my kids, lots of fruit and cheese. I didn't plan for too many special recipes, except for the juices, but that was more for myself to consume, not them.
In the long run, I'd like to get the kids down to very little dairy, if any, because I think that's where my family's allergy problems originate. And I know the amount of fruit they're eating isn't ideal, but until we cleanse their palates of all the sweets, I'm ok with good, seasonal, whole fruits and juices.
Tomorrow, we might spring for a gluten-free pasta for them, and hubby and I will make some stuffed squash... a new recipe, and if it works out well, I'll post it!
We started on Monday and the little princess was quite chipper about having some carrot sticks and ranch for breakfast! Don't you just love the "why are you pointing that camera at me this early" look, though?
As for my son, he was thrilled to be able to use the juicer and add whatever he wanted! It was mostly fruit, but he added carrots of his own volition and liked it so much that he wrote down what he used so he can make it again!
Here's a summary of what we've been eating this week:
Breakfasts:
- Bacon and eggs
- Omelets
- Juice (homemade)
- Carrots and dip
- Apples with nut butter
- Salads, salads, and more salads!
- Veggie juices
- Smoothies
- Baked paleo chicken nuggets
- Sliced cheese
- Steak, grilled chicken, and simple veggie sides
Now that doesn't sound so hard, right? The thing I've learned with my diet changes is that simpler is better. I didn't try making all the kids' favorites with new and expensive ingredients. Instead, we pared down to the basics. Lots of meat and veggies, and, to make the transition more palatable to my kids, lots of fruit and cheese. I didn't plan for too many special recipes, except for the juices, but that was more for myself to consume, not them.
In the long run, I'd like to get the kids down to very little dairy, if any, because I think that's where my family's allergy problems originate. And I know the amount of fruit they're eating isn't ideal, but until we cleanse their palates of all the sweets, I'm ok with good, seasonal, whole fruits and juices.
Tomorrow, we might spring for a gluten-free pasta for them, and hubby and I will make some stuffed squash... a new recipe, and if it works out well, I'll post it!
Wednesday, June 6, 2012
Stuffed Zucchini the way mom used to make
When I was a child, our neighbor had a vegetable garden, and he generously shared its bounty with our family. We had our own garden, too, but zucchini was not one of our crops. But I remember my neighbor's long green squashes piled on our kitchen table, destined to become either dinner, or many, many loaves of yummy zucchini bread.
I'm pretty sure I turned my nose up back then at any concoction containing the vegetable, but somehow I remember the taste of the beef and tomato stuffed veggies as vividly as I remember that the zucchinis themselves were as big as my arm. Aren't memories funny that way?
This recipe is a lot like my memories, and even more reflective of the way my family cooks... a pinch of this, a heap of that... you get the idea. I tried to write down actual amounts, but make it to suit your tastes and you'll be creating some great summer veggie memories for your family, too!
Baked Stuffed Zucchini
4 (grocery-store-sized) zucchini
1 lb ground meat (I used turkey, but you can sub beef or chicken)
1/2 onion, chopped
2 cloves garlic, pressed
3 tablespoons of tomato paste
1 can diced tomatoes, undrained.
shredded mozzerella (optional)
dried oregano, parsley and basil
salt and pepper
preferred cooking oil
1. Preheat oven to 400 degrees.
2. Slice zucchini lengthwise then scoop out insides leaving a 1/4 inch zucchini "boat." Place the zucchini boats in a large baking dish in a single layer and drizzle with preferred oil and sprinkle with salt and pepper. Place in oven (while it's heating is fine) and allow to bake while you prepare the filling.
3. Heat preferred cooking oil in skillet on stovetop. Add onions and garlic and stir for about a minute until the ingredients are fragrant. Add ground meat and dried spice (approximately 3/4 tsp oregano, 1/2 tsp parsley, 1 tsp basil, salt and pepper to taste). Stir until meat is completely browned and drain if needed, returning to pan when finished.
4. Add tomato paste to skillet and stir. (Note: I used turkey, so I added 3 tablespoons of paste for richness. If I'd used ground beef, I'd probably reduce the amount of tomato paste.) Cook for 2 minutes, then add canned diced tomatoes. Stir to incorporate and add salt and other herbs as needed.
5. Remove zucchinis from oven and heap filling into them. Scatter any remaining filling around zucchinis in bottom of pan. If there is no leftover filling add just enough water to cover bottom of pan. Cover tightly with foil and return to oven. Bake until zucchinis are soft and filling is heated through (about 20 minutes).
6. If using cheese, remove pan from oven at the 15 minute mark, uncover and sprinkle cheese over top. Return pan to oven uncovered for remaining baking time.
Enjoy!
I'm pretty sure I turned my nose up back then at any concoction containing the vegetable, but somehow I remember the taste of the beef and tomato stuffed veggies as vividly as I remember that the zucchinis themselves were as big as my arm. Aren't memories funny that way?
This recipe is a lot like my memories, and even more reflective of the way my family cooks... a pinch of this, a heap of that... you get the idea. I tried to write down actual amounts, but make it to suit your tastes and you'll be creating some great summer veggie memories for your family, too!
Baked Stuffed Zucchini
4 (grocery-store-sized) zucchini
1 lb ground meat (I used turkey, but you can sub beef or chicken)
1/2 onion, chopped
2 cloves garlic, pressed
3 tablespoons of tomato paste
1 can diced tomatoes, undrained.
shredded mozzerella (optional)
dried oregano, parsley and basil
salt and pepper
preferred cooking oil
1. Preheat oven to 400 degrees.
2. Slice zucchini lengthwise then scoop out insides leaving a 1/4 inch zucchini "boat." Place the zucchini boats in a large baking dish in a single layer and drizzle with preferred oil and sprinkle with salt and pepper. Place in oven (while it's heating is fine) and allow to bake while you prepare the filling.
3. Heat preferred cooking oil in skillet on stovetop. Add onions and garlic and stir for about a minute until the ingredients are fragrant. Add ground meat and dried spice (approximately 3/4 tsp oregano, 1/2 tsp parsley, 1 tsp basil, salt and pepper to taste). Stir until meat is completely browned and drain if needed, returning to pan when finished.
4. Add tomato paste to skillet and stir. (Note: I used turkey, so I added 3 tablespoons of paste for richness. If I'd used ground beef, I'd probably reduce the amount of tomato paste.) Cook for 2 minutes, then add canned diced tomatoes. Stir to incorporate and add salt and other herbs as needed.
5. Remove zucchinis from oven and heap filling into them. Scatter any remaining filling around zucchinis in bottom of pan. If there is no leftover filling add just enough water to cover bottom of pan. Cover tightly with foil and return to oven. Bake until zucchinis are soft and filling is heated through (about 20 minutes).
6. If using cheese, remove pan from oven at the 15 minute mark, uncover and sprinkle cheese over top. Return pan to oven uncovered for remaining baking time.
Enjoy!
Subscribe to:
Posts (Atom)