Showing posts with label coop. Show all posts

Sunday, April 6, 2014

Saddle Style Poultry Water Nipples

With the threat of frost pretty much gone I decided to reconnect my PVC chicken waterer.  Much to my dismay it leaked.
Two of the poultry nipples were leaking.  One of them wasn't too bad, but the other was.  It looked like the silicone around it gave up and wasn't holding anymore.  I've had this problem before.
This style of poultry nipple isn't meant for PVC pipe.  The silicone helped, but didn't last through the winter.

I didn't want to deal with fixing it only to have it fail again.  So I ordered some saddle style poultry nipples that are made specifically for 3/4" PVC pipe.
The project was pretty straight forward.  I cut a new piece of PVC pipe to the same length as the old one and then held the two pipes together with clamps.  Then I drilled 5/16" holes in the new pipe using the poultry nipples in the old pipe for reference.
Then I snapped the new saddle style nipples into the new pipe.
The last step was to re-attach the pipe to the chicken coop and connect the water.
There were no leaks.  If you're going to use PVC pipe to water chickens I'd highly recommend these poultry nipples over the ones I originally used.  The only downside is price.  These were ~$14 for 5 of them.  The last ones I got were ~$8 for 10.  That's quite a difference.  It's the reason I bought the ones I did the first time.  I've learned from experience that it wasn't worth it. 

Sunday, May 12, 2013

Yet another chicken waterer.

Making sure the chickens have clean water is a pain.  I have a gallon sized waterer similar to this one.  I have it on top of patio stones stacked two high.  It's close to 6" off of the ground and I still find dirt and leaves in it all the time.  I've written about this before.  To solve this problem I created a waterer with poultry nipples and a PVC pipe.  That has worked alright, but it only holds a little more than a gallon of water.

So, I decided to make another one, this time with a larger reservoir.  I bought threaded poultry nipples from Amazon.  These are meant to be screwed into a flat surface like the bottom of a bucket.  I wanted to see how they'd work in a PVC pipe.

I started by cutting a section of 3/4" PVC pipe to length.   Then I put a clamp on it to keep it from rolling.  I marked every 10" for holes.  I then drilled the holes with a 5/16" drill bit.  (This is important.)

Next I wrapped the threads with Teflon tape.
 

I attempted to screw these things into the pipe.  They wouldn't go.  I thought for sure that I had read that they required a 5/16" hole.  That's what I drilled, but they would not go in.  I eventually got frustrated and got out the 3/8" bit.  That made the hole plenty big.  But, the things leaked like crazy.  I solved that problem with some silicone.  I waited over night for the silicone to dry and then mounted the pipe to the chicken coop with these clamps.

On one end I place a slip to MHT PVC adapter.  I closed it off with a hose cap.  I did this for two reasons.  It allows me to drain the pipe in the winter when there's a chance of freezing weather.  I can also open it to allow air to escape.

The other end of the pipe has a slip to FPT adapter and an MPT to barb connector for connecting the reservoir.

My reservoir is a 5-gallon bucket.  I drilled a 1/2" hole in it and inserted a 1/2" barb coupling.  Surprisingly, this hasn't leaked.

Here's a picture of the entire setup.  I have the bucket elevated on a log.  I used irrigation tubing to connect the bucket to the pipe.  

One final note about the poultry nipples.  After I completed this project (with a lot of frustration) I read the customer reviews on Amazon.  Someone posted that the correct drill bit size to use was 11/32".  I used 5/16, which by my math is 10/32".  That means that 1/32" of an inch caused me a whole lot of aggravation and time.  I'll need to do a little more research next time.

Saturday, April 20, 2013

Chicken coop motion light

I have no light near my chicken coop.  Frequently I don't get out there to close the door until after dark.  This is annoying.  I don't like to fumble around and trip on uneven ground while attempting to close the door.   So I got on Amazon and found a battery powered LED motion light.  It takes 3 AA batteries.  Installation was easy.  It required attaching a bracket to the coop with two screws.

I've been fairly impressed with it so far.  It provides enough light that I longer have to take a flashlight with me.  It stays on for 45 seconds after detecting motion.  The dog even sets it off.  I don't know if opossums set it off or not (I don't want to find out either).
This photo was taking with the flash on my phone.  It doesn't light up the coop as much as shown.

Sunday, March 24, 2013

Chicken coop cost.

On more than a few occasions I've been asked how much my chicken coop cost to build.  I'll try to provide as many details as I can here.  Some of the materials I used were leftover from previous projects.  Their cost to me for the coop was $0.

The table below is a materials list containing links to Home Depot's web site.  I don't have every receipt from the project so some of the items listed are from memory.  I used the prices from the receipts that I do have.  The other prices came from HD's web site.  

QuantityDescriptionPriceTotal
315/32x4x8 Plywood17.87 53.61
14x4x6 Pressure Treated timber5.27 5.27
115/32x4x8 OSB9.87 9.87
302x4x8 Dried Whitewood Stud2.92 87.60
62x2x8 Spruce-Pine-Fir Furring Strip1.53 9.18
119/32x4x8 Sheathing20.97 20.97
1Charcoal 3-Tab Shingles22.0022.00
1Felt Roof Deck Protection15.5015.50
1Galvanized Hardware Cloth9.979.97
26Hurricane Tie0.5213.52
Total:
247.49

I know there are things missing from this list.  I didn't include nails, screws, hinges, hooks, and latches.  As I mentioned above, and in my post about the nesting boxes, I used leftover OSB to build the nesting boxes.  You'll need material for those as well.  I didn't include paint because I used primer and paint that I already had.

I also seem to remember having a few 2x4's left over.  I don't think I needed all 30 of them, but I don't remember how many I did need. 

In any case, the above list should provide an idea of what it costs to build yourself a decent 4x8' chicken coop.  I'd estimate that it's easily doable for $300-350 (in early 2013, who knows what prices will be in the future).


Wednesday, January 2, 2013

Chicken water

Chickens need clean water.  Keeping it clean can be a problem.  They tend to stir up dust, step in it, poop in it, etc.  When it gets gross they tend not to drink it.  I wouldn't either.

You can see the device I've been using to water the chickens up until now.  I got it at the local hardware store.  I would say that it works OK, but I have to change the water in it frequently.  I have it under the coop and elevated on a landscaping stone, but it still gets dirty.

The solution?  I went to the local Agri Supply and found poultry nipples.

Then I went to my shed and found some 4" PVC pipe.  Originally this was going to be a strawberry planter.  I never got around to using it.  My strawberries went directly in the ground.  So I re-purposed it.  

I had drilled holes in the bottom of it for drainage.  That's great for a strawberry planter, but not so good when you want it to hold water.  A little duct tape fixed that.  I drilled two bigger holes and installed the poultry nipples.

Then I drilled two holes at the other end of the pipe and ran para cord through them.  After that I hung it on the side of the coop and filled it with water.  It holds just under a gallon.  

I have to say that the water in it has stayed clean.  But... I can't tell if the water level has gone down much or any at all!  I haven't seen a chicken drink from it.  So it's hard to say if this has been a success or not.


Bonus picture!  Here's a chicken laying an egg.

Monday, September 10, 2012

Eggs (finally!)

We finally have eggs!  We've been searching for eggs all over the yard for the last week.  Today my kids noticed not one, but two in the coop!  Of course they were in the furthest, hardest to reach corner and not in the nesting box.

We don't know which chicken laid them, or when.  I'm guess that one was laid yesterday and the other today. 

This is exciting.  Hopefully we'll have more soon.


Wednesday, August 8, 2012

Chicken coop finished.

The roof of the nesting boxes is in place in this picture.  You can't tell from the picture, but I bevelled the front edge so it sits flush against the wall.


The first sheet of plywood is on the roof.

I finished the roof with some OSB and attached the plywood to the front wall.

The door has been hung and a latch will keep the chickens in and the critters out.

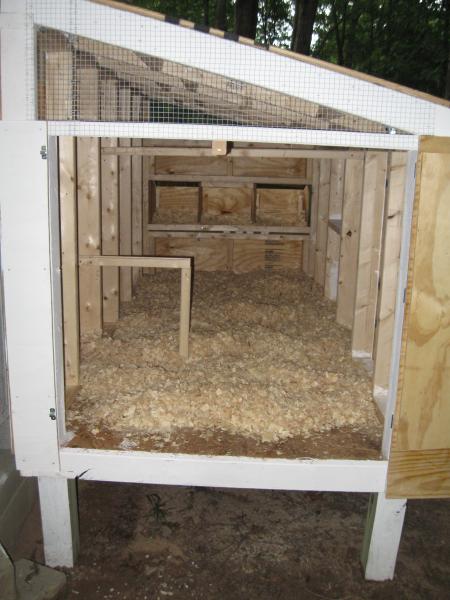
The door on the end will allow me to access the coop to clean it.

Two latches keep the door closed.
 The pine shavings have been installed.
 The birds on their first night in the new coop.  The first two nights they went into their old coop and I had to transfer them.  After that they figured it out and went in the new coop on their own.

The roof of the nesting boxes is hinged.  That'll make getting the eggs easier.
 Finally, I installed a nice ramp for them.

The roof was shingled and the entire coop was primed and painted.  

Sunday, August 5, 2012

Chicken coop cont.

The chicken coop continued... The nesting boxes and roof.

I made three nesting boxes out of some scrap OSB that I had laying around.


The rafters for the roof are notched 2x4's.  Then ends are cut at angles.  A miter saw would have made this a lot easier, but I managed with a circular saw.

Rafters in place with blocking in between them.  I also used hurricane ties at each end to hold them to the walls.

Here's a view from the inside.

I put chicken wire over both ends.  This should help keep the critters out.


More chicken wire mesh on the ends will allow for lots of ventilation.

I haven't mentioned it so far, but most of the structure was primed with white primer.  Hopefully that'll help protect it from the elements. 

Wednesday, August 1, 2012

Chicken coop

The chickens are no longer small.  They needed bigger housing, so I built a new chicken coop.

I placed my order through Home Depot's web site and got an email when it was ready.  That was the way to do.  There was no need to wander up and down the aisles and pull stuff off.  They did it all, and then they loaded it into my vehicle.  I had to drive with my knees in the dash, but 4x8 sheets of plywood do fit in a Kia Sedona.

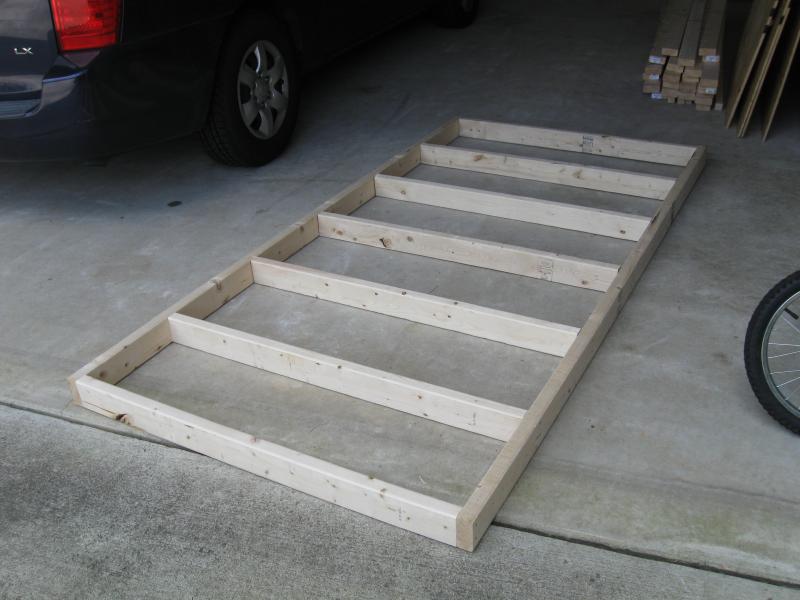
I started by building the floor.  It measures 4x8.  

Here it is with 4x4 lets attached.  It's on a level spot behind the shed.  This keeps it somewhat out of site.  

For the floor I used a sheet of half inch OSB.

The back wall was essentially the same as the floor.  It's 4' high.

Here's the back wall attached to the floor and held in place by some extra 2x4's.

The front wall is 3' high

The design more or less came from a book my wife picked up, "Chicken Coops for Dummies."  That book had a design for a basic 4x4' coop.  I doubled that and made mine 4x8'.  The nesting boxes I built were different too, but I'll get to those later.