Showing posts with label rv pump. Show all posts

Thursday, May 18, 2017

Relocating my rain barrel water pump (update #2).

I had some doubts about moving my rain barrel pump to my crawlspace. I had some leaks initially, but I managed to resolved those. Now that that they are gone I'm pretty happy with the setup. The pump is barely audible inside the house.

I decided to improve things further by adding a pressure gauge. I fussed around with setting the pressure on the pump before. The gauge I used for that was attached to one of the hose bibs. I think adding a gauge closer to the pump will be better. It'll certainly be easier to make future adjustments.

I found all of the parts that I needed at Lowes.
I screwed the brass bushing into the threaded side of the PVC elbow and then screwed the pressure gauge into the bushing. Then I cut and glued all of the PVC pipe and fittings to get what I have in the picture below. 
I plugged the pump back in and everything worked just as I hoped it would.
I was able to see the pump kick on when the gauge fell to 30 psi. Unfortunately it shut off just under 50 psi. I know I had it shutting off just over 50 psi previously. That was with a different gauge at a different location. I'll have to try to adjust it a little higher sometime when get a chance. For now everything seems to be working fine.
I've already used almost 300 gallons of rain water this year.

Wednesday, April 26, 2017

Relocating my rain barrel water pump (update #1).

I had the bright idea to relocate my rain barrel pump to my crawlspace. So far it hasn't gone as planned. The washer hoses I used to make connections wouldn't seal. I had to replace one. Then I discovered that one of the fittings on my pressure tank had cracked.
I decided to redo all of the piping. The picture below is what I came up with.
I took the pipe vertical instead of horizontal. The key thing that made this possible was a 3/4" elbow with a 1/2" pipe thread outlet. This kept my drain at the bottom. I installed the pressure relief valve further up and the PEX adapter at the top.
The picture below shows it in place in my crawlspace. Initially it worked great, but after a couple of days I noticed it dripping where the PVC pipe attached to the tank. I had to pull it out and screw it down a couple more turns. I'm hoping that will solve the issue.

Below is a picture of the old piping for reference.

Sunday, April 9, 2017

Relocating my rain barrel water pump.

I mounted the pump for my rain barrels to the under side of my deck last year.
Then I used the pressurized water from the pump to flush a toilet. I was fairly happy with the results. The biggest downside that I had was the noise.  The pump isn't that loud really, but what sound it does make is amplified through the deck. I figured that the solution is to move it to the crawlspace.

The first step was getting the water into the crawlspace. I didn't want to buy a massive hammer drill so I ran a pipe through one of the little ventilation windows.
PVC pipe running from the barrels to the house.
PVC pipe going through the ventilation screen. Most of the pipe is buried under an inch or two of dirt.
I put hose fittings on both ends of the PVC pipe. Inside the crawlspace I included a shutoff valve. I wasn't sure that this setup was going to work. It requires the pump to pull the water from several feet away, and it has to lift it up the pipe and through the window. The pump had to lift the water in its previous position, but it was much closer to the source.
I have the pump sitting on the floor for now.  Eventually I'd like to mount it to something more permanent. I connected a garden hose to it just to verify that it would work.
The pump was able to move the water from the barrels through the hose.
The next step was to connect the pump to the PEX tubing and pressure tank. I used the old washer machine hose that I had used previously. Sadly, it had slow leaks at both ends. I put the pump on a bucket to help deal with that.
I was able to pressurize the system to 46 psi or so. The pump is supposed to shut off at 55 psi. I got on the old Internet and looked up how to adjust the shutoff switch. It took a little playing around, but eventually I got the pump to shut off  around 53 psi. That was good enough for me.
Then I unplugged the pump, shut off the supply line, and drained the pressurized side. I need to get new washers for my supply hoses before hooking it up again. I can't have water leaking in my crawlspace.

Sunday, November 27, 2016

Rainwater usage update & analysis

At the beginning of October I reset my flow meter to zero.  I wanted to measure exactly how much rainwater I used in one month.

The result?  I used 607.7 gallons. That was for flushing a toilet, washing cars, and watering the lawn.  I wanted to use up what I had in the barrels.  Good thing I did too, because it went below freezing in the first week of November.
My sophisticated gauge showed that my barrels were empty on November 2.  I used a shop vac to remove the inch or two of water that was left in the bottom of each barrel.  Then I disconnected the hoses from the pump and briefly ran it to get any remaining water out.

So what are the results? 

I've been saving my water bills for the last few months.  I think the results are inconclusive.  The bills range from 28 to 34 days so I can't compare total gallons used.  Thankfully the water company is kind enough to list the average daily usage.  They even include a handy-dandy graph.
My average daily water use for my August bill (July 08 to August 05) was 125 gallons.  I ran rain water to my toilet on August 13.  I expected to see a drop in water usage on the next bill.  But it hardly made a difference.  My average daily usage for my September bill (August 05 to September 08) was 123 gallons.  My usage dropped only 2 gallons per day!

The October bill is where things got interesting.  It ran from September 08 to October 07.  My daily average usage for it was 100 gallons.  That was a big drop.  I have no explanation as to why.  My most recent bill (October 07 to November 07) average usage was 119 gallons.  That was with the toilet back on the house water for the last 5 days of that billing cycle. 

I don't know what to make of these results.  I was expecting to see fairly significant (5-10 or more gallons per day) drops in my water usage, and I only saw that during one month.  It hardly made a difference in the other months.  I can say that my bills would have been higher without the rainwater.  I'll certainly keeping an eye on this next year.  It'll be interesting to compare those graphs year-to-year.

Tuesday, September 13, 2016

Rainwater usage report after one month

I've been flushing one of my toilets with rain water for a month now.  The results are in.  The flow meter says that I've used 565.5 gallons of water. 
Not all of that water was used to flush the toilet.  I also pressure washed some of the driveway and washed my cars.  That doesn't really matter though.  Using rain water means that I'm not using water from the water company.  I'm interested to see how my bill will be affected.  I just have to wait and see.

Wednesday, August 24, 2016

Rainwater usage report

Earlier this month I attached the toilet in my powder room to my high pressure rain water system.  At the same time I installed a flow meter to measure how much rainwater I was using.  I checked tonight, and after 10 days I used 206.1 gallons of water.
The top number shows how much water was used since the pump last ran.  It gets reset by pushing the left button, or after 30 minutes of inactivity.  The bottom number is cumulative.  It gets reset with the right button, otherwise it just keeps counting.  The biggest drawback is that it only measures up to 999.  After that it goes back to 0. 

The other noticeable thing is the 1.8.  My toilet clearly says "1.6 gpf" right on it.  That's either a lie or the meter is wrong.  I guess since the water is free I shouldn't worry too much about it. 

I should also note that not all 206 gallons was due to the toilet.  I did wash my cars the other day.  I checked the meter then and had used about 30 gallons. 

I'm happy with the result, but it doesn't tell the entire story!  The flow meter only measures the high pressure water going through the pump.  It doesn't measure the low pressure drip irrigation system.  I'm saving water there too!  I just don't know how much.  I connected the flow meter to the drip irrigation line, but the flow was too slow to register. 

Sunday, August 14, 2016

Using rain water to flush a toilet

I've wanted to use rain water to flush toilets for quite some time.  I got a notice from my water company the other day saying that they were raising my rates.  That motivated me to plumb the toilet into high pressure rain water system sooner rather than later.

I started by drilling a 5/8" hole in the floor behind the toilet.  I hated to put a hole in the hardwood floor, but this was a lot easier than opening and then repairing the wall.
 Next I went into the crawlspace and pushed the reclaimed PEX pipe through the hole.
Then I had to go back to the powder room and connect the valve to the pipe.  I love these Sharkbite push-to-connect fittings.  They're expensive, but so easy to work with.  You just push the pipe into the opening and you're done. 
 I used a braided hose to connect the valve to the toilet.
Then it was back to the crawlspace.  I used another push-to-connect fitting to tie the new line from the toilet into the existing line.
Finally I added a warning tag to the supply line and opened the valve.  I'm pretty sure the tag is required by code, although I doubt too many people would attempt to drink toilet water.  I wanted it more for a means of advertising the fact that the toilet is being flushed with rain water.

Everything works fine.  The toilet fills more slowly than it used to, but that's not a big deal.  (The pump gets the water to 55 psi and the city water is 80 psi.)
Lastly, I added a flow meter to the pump.  This will give me some idea how much house water I'm saving by using rain water instead. 

Monday, July 25, 2016

The rain water pressure tank has been relocated.

Let me be perfectly clear with this post.  I am not a plumber.  I am not an expert on building codes.  I'm making this post to show what I did in my situation.  It is not intended to be a how-to guide.  Always seek qualified professionals when making home improvements.

That said, I finally got around to relocating my pressure tank to my crawlspace.  I don't know if it was absolutely necessary (again, I'm not a plumber) but I thought that getting it out of the elements was a good idea.  It's also cooler down there so it won't be subjected to the high (90+ degree) heat and temperature swings.  Also, I won't have to drain and move it in the winter.

I used the following:
I glued all of the PVC connections and used thread sealant on the brass fittings.
The pressure tank is rated to 100 psi.  The pump that I have shuts off at 55 psi.  In theory the pump should never cause enough pressure to make the tank fail.  I didn't want to take any chances.  I got a spring loaded pressure relief valve that opens at 75 psi.  The hose connection allows me to drain the pressure tank, and the other connect attaches to the existing PEX pipe I recently ran through my crawlspace.
The above picture shows the tank in its final location.  It's against the wall out of the way near my water heater. 

Friday, July 1, 2016

Moving rain barrel water to another location

The pump I mounted under my deck has been working great.  The one downside is that the pressurized rain water is only available in my back yard.  I frequently need water in my front yard.  The solution was simple, but not easy to implement. 

I bought 100' of 1/2" Purple Reclaimed Water PEX Pipe on clearance from Home Depot 2 years ago.  I knew that someday I might need it for this reason.  I lucked out.  I paid $32 at the time.  The 100' coils have been discontinued, and the 300' ft. coils are $118. 
I attached one end of the PEX pipe to the PVC pipe under my deck.  I drilled a hole through the wall and ran the pipe into the crawlspace.  This was the difficult part.  Crawling around in 35" of space and snaking pipe around obstacles, and nailing it in place isn't easy. 
I attached the other end of the pipe to a frost proof sillcock at the front of my house.  I mounted it near my existing hose bib.  That way I could fill the rain barrels that feed my drip irrigation system when they get low.
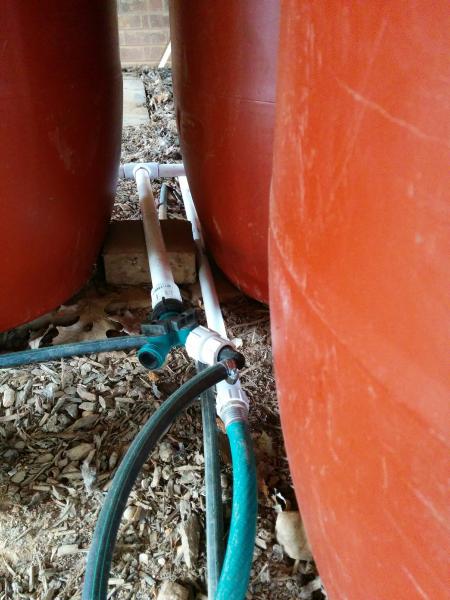
I was tickled with delight when I turned the valve and water came rushing out.  The next step was to connect the rain barrel to the new hose bib.  I did that and immediately had a problem.  The float valve in the barrel had too much resistance and caused the pump to pulsate very badly.  (The pump comes on at 30 psi and goes off at 55 psi.)  The float valve in the picture below is rated for 1.5 gpm at 60 psi.  The pump was pulsating and shaking violently while trying to push water through it.  I was very disappointed.
My solution was to change out the float valve.  I had the one in the picture below from the rain barrel that I had next to my chicken coop.  It wasn't being used since I recently moved that barrel to my front yard.  This valve is rated at 12.5 gpm at 60 psi.  It allowed the pump to operate with out pulsating for a little while.  When the water level started to get high, the valve started to close causing back pressure which made the pump once again pulsate. 
The pump works great with sudden on/off changes in pressure.  It doesn't like gradual changes at all.  There's a solution for this.  I needed a pressure tank.  What's a pressure tank?  It's a water tank that also has a pressurized air bladder.  When a valve is opened the air pressure in the tank causes the water to flow.  As the tank empties the pressure drops and the pump turns on.  It eliminates the pulsating pump issue.

Initially I was going to get the Shurflo Accumulator Tank.  They made the pump, so why not get their tank?  It looked small, super simple to hook up, and it was only $41.  I read the reviews and saw that they only hold 10-16 oz. of water (no one was really sure of the exact amount).  That didn't seem like much of a buffer.  Luckily for me, my local Lowes had a 7-gallon pressure tank on clearance for $41.  The tag on the shelf said $88, and that's the price it was listed for at that other Lowes in the area.

The box looked pretty beat up.  When I got it out I noticed some scratches, and the manual said the pressure was set to 25 psi from the factory.  I checked it with a tire gauge and it was at 39 psi.  Someone bought this thing and returned it.  I was fine with that as long as it worked.  I put a 3/4" FPT x 3/4" FHT fitting on the tank, and attached it to my PVC pipe with a garden hose.  This is not, is not, _is not_, a permanent solution.  I'm going to move the tank into my crawlspace and plumb it in properly.  I just wanted to see if it would solve my pulsating problem.
The pressure tank worked perfectly.  I was able to fill the barrel in my front yard without the pump pulsating at all.  It never had an issue.  It would come on, fill the pressure tank, and shut off.  Then the water would trickle into the barrel with just the pressure from the pressure tank.  I'm really pleased with how it works.
My last step was to label the hose bib.  I don't want anyone to mistake it for municipal water.  It's untreated and while my rabbits and dog have been drinking it for years, it's probably not suitable for humans.

Sunday, May 29, 2016

Mounting the rain barrel water pump.

I've had a lot of rain the last few weeks.  My new under-deck barrels are now completely full.  I attached a clear tube to the outlet so I can see exactly how full they are. 
I have some very minor leaks.  If these barrels ever end up empty I'll seal them.  Anyway, now that I have water I can finally mount the pump and make use of it.

I started by screwing a board to the under side of my deck.  Then I screwed the pump to it as high as I could.  
I replaced my washing machine hoses last summer and kept the old ones.  They seemed perfect for this application.  I connected the output of the barrel system to the input on the pump.  I connected the second hose to the output of the pump and put the other end in the nearest barrel.  Then I plugged in the pump for a test.  It worked great, but there was just one problem.  I quickly realized that the pump was filling the barrel faster than it was draining back into the other barrels.  I had to scramble out from under the deck to unplug the pump.  Oops.
My next step was to rig up some PVC pipe.  The vertical pipe in the picture below has a male hose fitting at the bottom.  This is what the output of the pump connects to.  I kept it vertical so it would drain easily for winter.  At the top of the vertical pipe I put a 90* elbow with a shutoff valve.  Not visible in the picture is a 1/2" brass Pex fitting after the valve.  That is for future expansion.
I added a horizontal pipe to the tee fitting.  On the end of that I placed a hose bib.  I glued all of my PVC fittings since they'll be under pressure.  The pump has a built-in pressure switch which turns the pump off at 55 PSI.
I can attach a hose to this hose bib and move water wherever I need it. 
The final step was to plug in the pump and test it.  I attached a garden hose to the hose bib and much to my surprise, the pressure was better than I expected it to be.  I was able to spray water pretty far across my yard.  When I let go of the trigger and stopped spraying, the pump automatically shut off.  Everything worked exactly as I wanted it to. 

Friday, May 27, 2016

Adding a float switch to a Shurflow 4008-171-E65 pump

About a year ago I got a Shurflow 4008 RV pump to move water out of my rain barrels.  I've used it on and off since then.  I ran into a few issues.  The first is that I ran out of water frequently.  I'm hoping that I have alleviated that problem by adding more barrels.  The other, and bigger issue is that the pump doesn't shut off when the barrel is empty.  It just continues to run and get very hot.  I needed to add a float switch to keep this from happening.
The float switch opens and closes a circuit depending on the angle of the float.  When the barrel is empty the pump will shut off.

I started by putting 3/16" quick disconnects on two wires of the float switch. I had to order the male disconnects from Amazon.  The female ones came from Auto Zone.
One end of the pump had two wires going into with with female disconnects. 
I filled a barrel with water and put the float in it.  I had to play around with the location of the weight.
Then I connected the male disconnect on the float switch to the female disconnect on the pump.  The female disconnect on the switch connected to the pump.
 Below is a picture of it all hooked up.
I plugged in the pump and drained the barrel.  When it was nearly empty the pump shut off.
I did have to play with the weight and the length of the cable a little bit to get things just right.  I don't want the pump to shut off when there's still plenty of water in the barrel, and I don't want it to run when there's no water left to draw.

The final step was to drill a hole in the lid, insert a grommet, and run the 10' cord through it. 
I put the lid on one of the newly installed barrels.  Now I just need to get the pump out there in a more permanent location.